

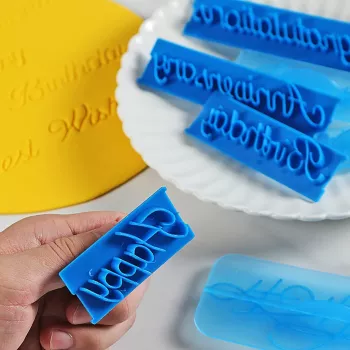
6-Piece Cake Letter & Number Stamp Set for Clear Messages
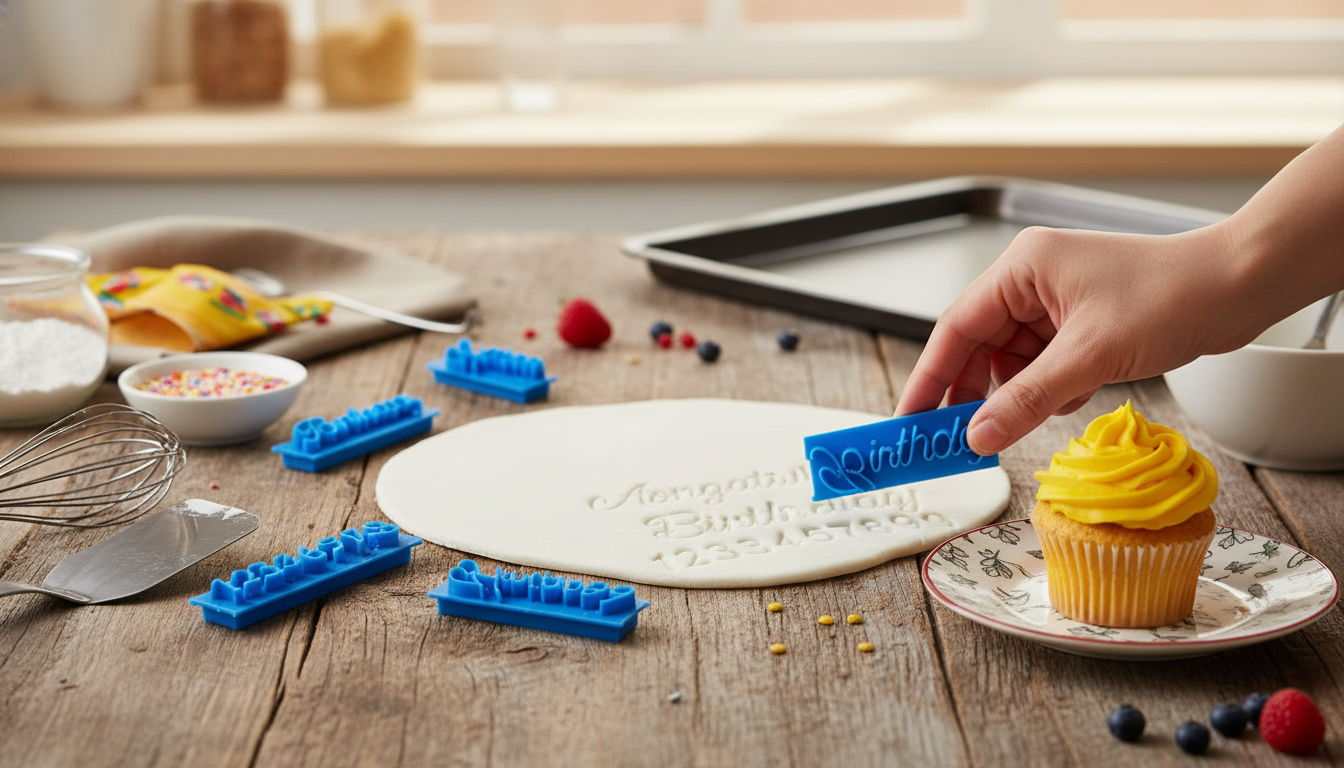
6pcs Cake Letter & Number Stamp Set for Decorating Messages
Clean, readable cake messages don’t have to rely on steady piping hands. A compact stamp set makes it easier to add names, ages, dates, and short notes to fondant, gum paste, cookie dough, and other soft decorating mediums—especially for birthdays, anniversaries, and celebrations where legibility matters. With consistent pressure and a smooth surface, stamped impressions can look polished and intentional, even when you’re decorating on a tight timeline.
What This Stamp Set Helps You Do
- Create crisp letters and numbers for simple messages like “HAPPY BDAY”, initials, ages, and short dates
- Keep spacing more consistent than freehand piping for quick, repeatable results
- Add personalized touches to cakes, cupcakes, cookies, and plaque toppers without specialized equipment
- Support last-minute customization for parties and events
If a celebration needs a clear name or age on top, stamps are a practical alternative to intricate lettering. They’re also useful for production-style baking where multiple items need matching text.
What’s Included and Typical Uses
- Set format: 6-piece stamp kit designed for letter/number impressions
- Common mediums: fondant, gum paste, modeling chocolate, marzipan, cookie dough, and chilled buttercream panels (when firm enough to take an impression)
- Best surfaces: smooth, rolled sheets; small plaques; tags; toppers; cookie fronts
- Ideal occasions: birthdays, baby showers, graduations, anniversaries, seasonal bakes, and gift boxes
Quick Reference: Where Stamps Work Best
| Medium | When to Stamp | Result | Tip |
|---|---|---|---|
| Fondant | After rolling and smoothing | Sharp impressions | Dust lightly with cornstarch to reduce sticking |
| Gum paste | Before it begins to dry | Very crisp detail | Work quickly; keep unused paste covered |
| Cookie dough | Before baking (well-chilled dough) | Visible baked-in mark | Test a single cookie for spread |
| Modeling chocolate | When pliable but cool | Clean imprint | Warm briefly in hands, then stamp |
How to Stamp Letters and Numbers Cleanly
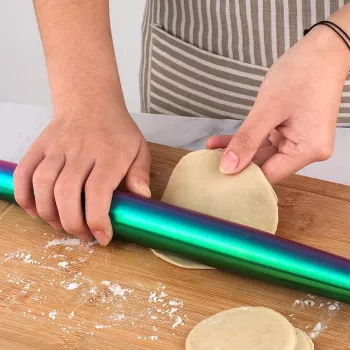
- Prepare a smooth base: roll to an even thickness and level the surface with a smoother or rolling pin.
- Reduce sticking: lightly dust the stamp face and the surface (cornstarch or powdered sugar depending on medium).
- Plan the layout: mark a faint centerline or use a toothpick to guide alignment before stamping.
- Press evenly: apply straight, firm pressure; avoid rocking to prevent double outlines.
- Lift straight up: pull vertically to keep edges crisp.
- Correct small mistakes: re-roll the area (fondant) or patch with a thin layer, then re-stamp.
For best definition, aim for a surface that’s smooth but not tacky. If the medium feels overly soft, a short rest time (or brief chilling, when appropriate) can help it take a cleaner impression.
Spacing, Alignment, and Readability Tricks
- Start from the center for names and ages so the message remains balanced.
- Use light guide dots: tiny marks can help maintain consistent spacing between characters.
- Stamp on a separate plaque for higher accuracy, then attach with edible glue or a thin layer of buttercream.
- For curved messages, pre-cut a gentle arc guideline on a plaque and stamp along the curve.
- Keep character size consistent by using the same pressure and stamping angle throughout.
A simple workflow for clean results is: roll a small plaque, mark a center point, stamp outward, then apply the plaque to the dessert. This reduces the risk of smudging text on a finished cake.
Cleaning and Care
- Clean promptly: residue is easier to remove before it dries and hardens.
- Use mild soap and warm water; avoid abrasive scrubbers that can roughen edges.
- Dry thoroughly before storing to prevent odor and residue buildup.
- Store together in a small pouch or container to avoid lost pieces and to protect stamp faces.
- If staining occurs from colored fondant, soak briefly in warm soapy water and rinse well.
Basic kitchen hygiene matters when tools touch ready-to-eat decorations. For deeper guidance on cleaning and sanitizing food-contact equipment, reference the USDA FSIS cleaning and sanitizing overview and the FDA’s Food Code resources.
Ideas for Messages and Designs
- Birthday top: name + age inside a simple stamped border
- Cupcake tags: initials or short words on mini fondant rounds
- Cookie sets: “ONE”, “TWO”, “THREE” for milestone shoots or party favors
- Anniversary plaques: “10 YEARS” with a small heart cutout
- Holiday bakes: short phrases like “JOY”, “NOEL”, or “2026” on giftable cookies
For extra contrast, brush stamped impressions lightly with edible dust or apply a tiny amount of food coloring gel diluted with clear alcohol/extract (used sparingly) to highlight the lettering without flooding the edges.
Pair With Simple Tools for Better Results
- Smoother sheets, sharper stamps: A consistent roll helps impressions read clearly. Pair the stamp set with the Stainless Steel Non-Stick Rolling Pin Set for Baking & Kitchen Use for an even thickness and a cleaner finish.
- Controlled dusting: Keep cornstarch or powdered sugar handy so you can dust lightly and avoid buildup that dulls detail. A small container like the Elegant Cork Stopper Glass Storage Jar – Transparent Food & Tea Container works well for quick, tidy access.
- Go-to personalization tool: When you need fast names, ages, and short notes, the 6pcs Cake Letter & Number Stamp Set for Decorating Messages is an easy add-on to a basic decorating kit.
FAQ
Can stamps be used on buttercream?
Works best on firm or chilled buttercream panels; stamp gently and test a small area first to avoid tearing. For soft buttercream, stamping a fondant plaque and placing it on top is more reliable.
How can spacing stay even across a word?
Mark a center point, stamp outward, and use light guide dots or a faint guideline. A separate plaque makes alignment easier, then it can be applied to the cake.
What should be done if the stamp sticks?
Dust the stamp face lightly, ensure the surface isn’t overly soft or wet, press straight down, and lift vertically. Re-chill or let the surface rest briefly if it’s too tacky.


Leave a comment