

DIY Storm Beetle 3D Puzzle: Build, Display, Improve Skills
DIY Storm Beetle 3D Puzzle: A Bold Build for Display and Skill-Building
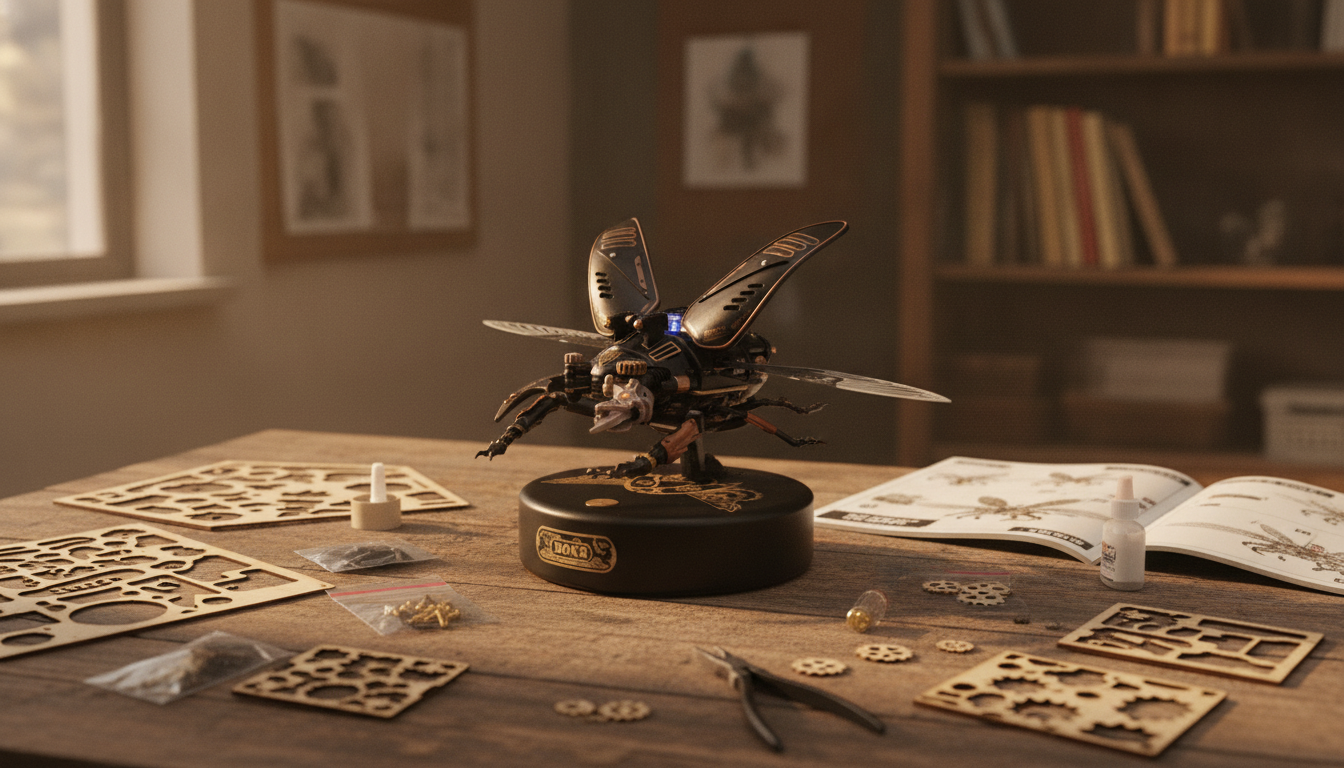
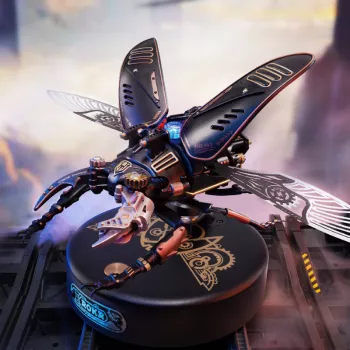
The DIY Storm Beetle 3D Puzzle is a hands-on build that blends crafting focus with a striking beetle-inspired display piece. It’s suited for makers who enjoy careful assembly, tactile problem-solving, and a finished model worth keeping on a shelf or desk. Beyond the satisfaction of clicking parts into place, the beetle silhouette gives the project a “mini model kit” feel—less like a flat puzzle and more like a build you can proudly show off.
Beetles are also a fascinating design reference in the real world—tough, structured, and visually distinctive. If you enjoy creature builds, it’s fun to compare your finished model’s lines and symmetry to actual beetle anatomy and variety, as covered by the Smithsonian National Museum of Natural History and Encyclopaedia Britannica.
What Makes the Storm Beetle Build So Satisfying
- A creature-inspired form: It feels more like a model project than a typical flat puzzle, with a strong “build and reveal” moment as the shape takes over your work surface.
- Skill-building without the pressure: Assembly encourages patience, sequencing, and fine-motor control—great for anyone who enjoys steady, step-by-step progress.
- Display value: The finished piece works as decor for workspaces, bedrooms, and hobby rooms, especially if you like bold, mechanical-creature aesthetics.
- Flexible experience: The build can be enjoyed solo for focused downtime or as a guided activity with a friend or family member (one person reads steps, the other assembles).
At-a-Glance Details
If you’re deciding whether this belongs in your cart or on your gift list, these quick details help set expectations.
| Item | Details |
|---|---|
| Product | DIY Storm Beetle 3D Puzzle |
| Price | 51.67 USD |
| Availability | In stock |
| Stock noted | 37 units |
| Product page | https://hovira.com/diy-storm-beetle-3d-puzzle/ |
- Best for: hobbyists, gift-giving, display-model fans, and anyone who likes step-by-step builds
- Good occasions: birthdays, holidays, rainy-day projects, and screen-free downtime
- Display appeal: looks great on shelves, desks, and in hobby collections
What’s in the Box and What to Prepare
- Puzzle/model components: Keep pieces grouped by type before starting. A quick sort upfront prevents the “where did that piece go?” loop later.
- Instruction steps: Follow the sequence. Skipping ahead often causes misalignment that only becomes obvious when later sections refuse to seat cleanly.
- Suggested prep: A clear work surface, good lighting, and a small tray or bowl for tiny parts.
- Optional tools: Craft tweezers for small pieces, plus a soft cloth to protect finished surfaces during assembly.
A small routine helps: lay out the day’s build stage, do a quick inventory glance, and keep a “completed parts” area so finished sub-assemblies don’t get mixed back into the pile.
Assembly Tips for Cleaner Fit and Better Finish
- Dry fit first: Before locking pieces together, do a quick orientation check. If something feels “almost right,” it’s often rotated or swapped.
- Build in phases: Body core first, then appendages, then decorative details. This keeps the model stable while you work and reduces stress on joints.
- Use even pressure: Press steadily rather than forcing a joint. Forcing can warp edges and weaken connections, especially on detailed corners.
- Organize to match the instructions: Keeping parts left-to-right in the same order the steps use reduces mistakes and keeps momentum up.
- Check symmetry: Pause occasionally to compare left/right sides so the model sits and displays evenly when finished.
If a connection is stubborn, step back and verify the previous step. A single slightly-off piece early on can ripple into multiple “why won’t this fit?” moments later.
Who It’s For: Skill Level and Use Cases
- Mindful builders: Great for anyone who enjoys calm, structured projects with a clear finish line.
- Teens and adults: A strong choice for those who like model kits, mechanical builds, or creature designs.
- Gift-worthy results: The end result is displayable, not disposable—ideal for someone who likes keeping what they build.
- Decor with personality: A fun addition to a maker corner, collectible shelf, or themed room decor.
Care, Display, and Longevity
When It’s Worth Buying vs. When to Choose a Simpler Project
Recommended Add-Ons (In Stock)
- DIY Storm Beetle 3D Puzzle — the main event: a bold, display-forward 3D build.
- The Clear-Mind Decision Maker | Printable Mindfulness Checklist for Clarity & Calm Choices | Ways to Calm Your Mind Before Making Decisions — a quick, calming printable that complements focused hobby time.
- Calvin Klein Men’s Pochette & Grooming Bag — a practical gift add-on if you’re pairing the puzzle with a “desk + daily essentials” theme.
FAQ
How long does it take to build the DIY Storm Beetle 3D Puzzle?
Most builders can expect a few hours, with faster completion if you’re experienced and slower if you’re carefully sorting and double-checking each step. Taking short breaks often improves accuracy and helps keep later assemblies aligned.
Is this puzzle better as a toy or as a display model?
It’s best treated as a display build: something you assemble, admire, and keep on a shelf or desk. Frequent handling can loosen connections over time depending on the materials and how tightly parts were seated during assembly.
What tools are helpful for assembling a 3D puzzle model?
Good lighting, a small parts tray or bowl, and tweezers can make small pieces easier to manage. A soft cloth is also helpful for protecting surfaces while you work and for gentle dusting after it’s displayed.


Leave a comment