

Gradient Raindrop Resin Nail Charms (60pcs): Wet-Look 3D
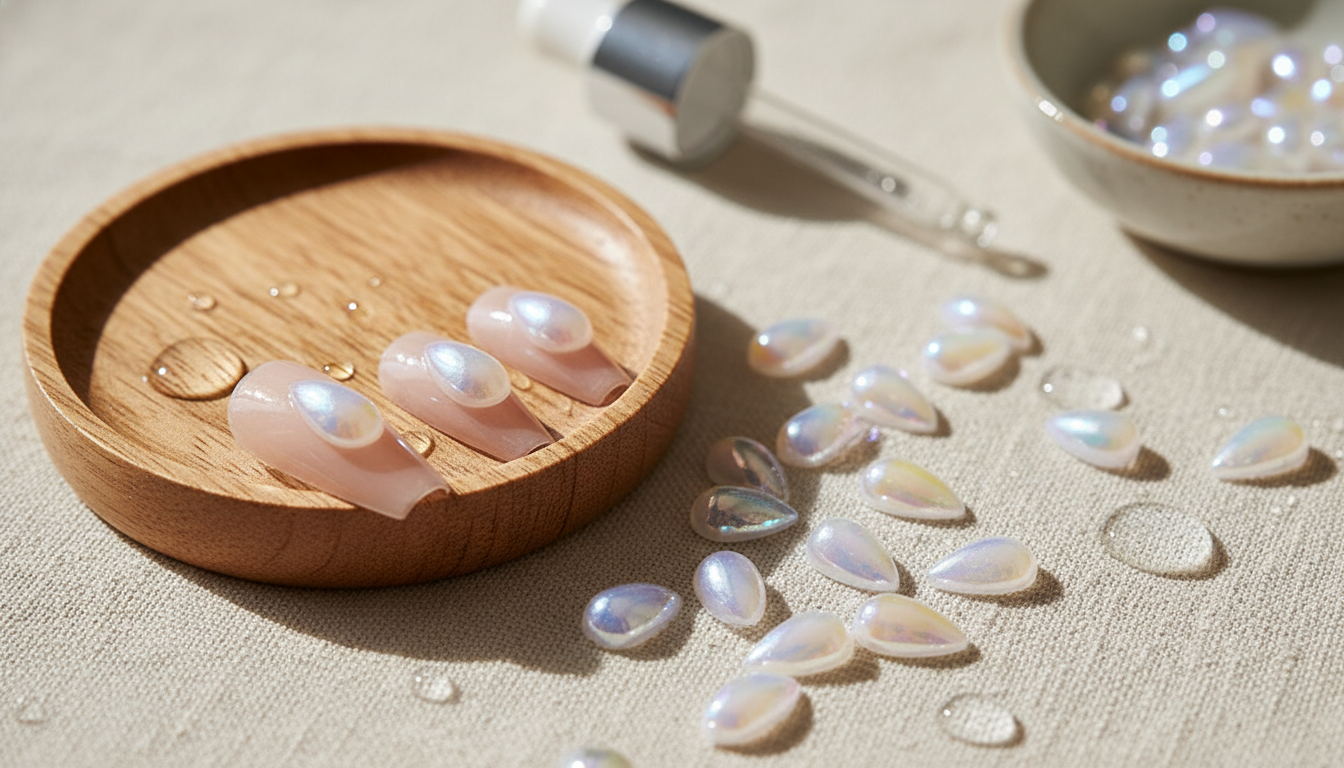
60PCS Gradient Raindrop Resin Nail Art Charms: 3D Water Drop Decorations for DIY Manicure
Gradient raindrop resin nail charms are a quick way to get that glossy, dimensional “wet look” without needing advanced 3D sculpting. Their translucent fade catches light like real water droplets, adding depth to simple color sets as well as dramatic chrome or aura designs. Below is a practical guide to what these 3D water drop decorations are, how to apply them so they stay put, ideas that flatter different nail lengths, and how to remove them with less damage to the natural nail.
What Gradient Raindrop Resin Charms Are
These charms are small resin embellishments shaped like rounded water drops. The defining detail is the translucent gradient finish—often a soft fade from clear to a tinted hue—that mimics the look of moisture sitting on the nail.
- 3D, raised profile: They sit above the nail surface to create a dome-like highlight that makes even a single-color manicure feel more layered.
- Light-catching shine: Resin tends to look glassy, especially when paired with a glossy top coat placed around (not over) the dome.
- Best with stronger adhesives: Nail glue can work for quick sets, while builder gel or thick gel usually gives a more secure, long-wear bond.
- Style-flexible: They fit clean “glass” nails, mermaid/aura looks, Y2K jelly colors, and minimal accent placements that feel modern and tidy.
Quick Specs and What They Mean for Wear
A 60-piece set is typically enough for multiple manicures: one-drop accents, clustered “raindrop” feature nails, or mixing different nail designs across both hands. The main wear factor is the 3D height—beautiful in photos, but it needs thoughtful placement to avoid snagging hair, sweaters, or pockets.
- Pack size: 60 pieces supports experimentation (test placements before committing) and still leaves plenty for future sets.
- Raised surface: Higher domes look more dramatic, but they’re better placed away from the free edge where impact happens.
- Resin material: Lightweight and glossy; it holds up well when edges are sealed so water and friction don’t work underneath.
- Gradient finish: Especially flattering over sheer bases, syrup/jelly colors, and chrome or pearl effects for a “dewy” finish.
At-a-glance: Matching charm size and placement to nail type
| Nail type | Best placement | Why it works | Hold recommendation |
|---|---|---|---|
| Short natural nails | Single accent near cuticle or center | Keeps the look balanced and reduces snagging | Nail glue + top coat around edges |
| Medium length | 2–3 drops across feature nails | Enough space for a clustered “raindrop” effect | Gel/builder base + cure + top coat |
| Long extensions | Diagonal or scattered layout | Creates movement and a high-impact 3D set | Builder gel encapsulation where possible |
How to Apply Raindrop Charms So They Stay Put
Longevity comes down to three things: surface prep, using the right adhesive, and sealing the base perimeter. If you want the “drop” to stay glassy, avoid painting an opaque or overly thick top coat directly over the dome unless your top coat is crystal-clear and self-leveling.
- Prep first: Start with clean, dry nails. Remove oils, push back cuticles, and lightly buff so the adhesive has a better surface to grip.
- Choose an adhesive: Nail glue is fast for press-on vibes; builder gel or thick gel usually provides a stronger, longer-wear hold for daily life.
- Place with control: Use tweezers or a wax pencil. Press gently and hold for the initial bond (especially important with glue).
- Seal smartly: Add top coat around the base/edges to reduce lifting. Leave the dome mostly uncovered if you want maximum “wet look” shine.
- Cure steps (gel): Flash-cure each charm briefly so it doesn’t drift, then do a full cure before finishing the manicure.
If you’re using gel systems, follow product directions carefully and use nail lamps as intended. For general cosmetic safety guidance, refer to the FDA’s nail care products overview.
Design Ideas That Suit the Gradient Water Drop Look
Gradient drops look best when the base color supports translucency—sheers, milky nudes, jelly tones, and soft fades. They can also create contrast on darker colors, where the drop reads like a glossy highlight.
- Dewy nude: Sheer pink or milky base with 1–2 drops per nail for a clean, hydrated finish.
- Ocean glass: Teal/blue base with scattered drops; add subtle shimmer under the charms for depth.
- Aura fade: Soft airbrushed center color with drops placed toward the aura edge to amplify dimension.
- French twist: Micro-French tips plus a single drop on the ring finger for an easy accent.
- Party glaze: Chrome or pearl effect with drops concentrated on feature nails so the texture looks intentional, not busy.
How to Choose Similar 3D Nail Charms
Removal and Nail Care After 3D Charms
For additional nail cosmetics safety tips, the American Academy of Dermatology’s guidance on nail cosmetics is a helpful reference.
Common Mistakes That Cause Lifting or Snagging
FAQ
Can raindrop resin nail charms be used with regular nail polish?
Yes, but polish alone won’t hold a 3D charm reliably. Use nail glue or a thicker gel product for attachment, then seal around the base edges with top coat to help prevent lifting.
How do 3D water drop charms stay on longer without snagging?
Place them away from the free edge, choose lower-profile drops for shorter nails, and secure them with gel or strong glue. Sealing around the base perimeter (instead of coating the entire dome) also helps reduce snagging while keeping the “wet” shine.
How are resin nail charms removed safely?
Don’t pop them off. Soften the glue or reduce the gel layers first (soak or file-down depending on your system), then gently slide the charm away and moisturize nails afterward.


Leave a comment