

Touch-Screen Chocolate 3D Printer for Precise Decor
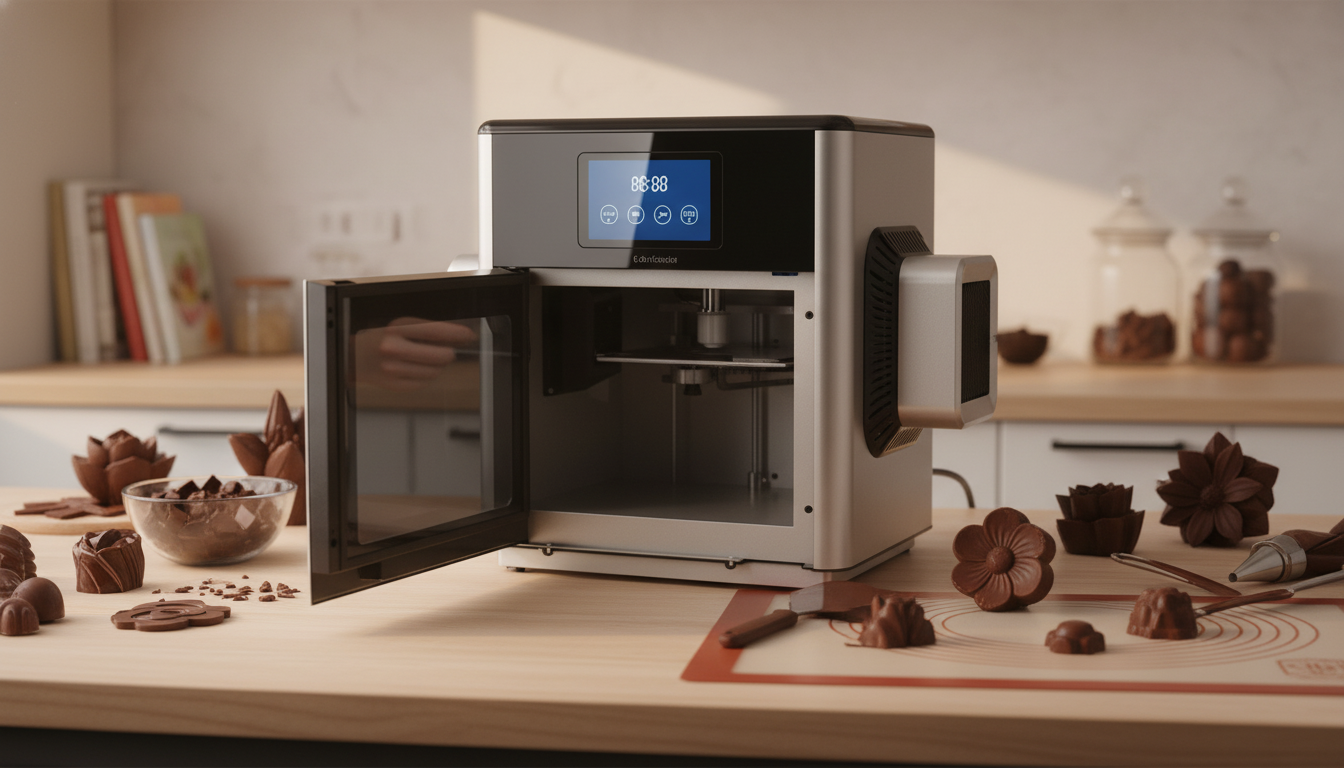
Touch-Screen Chocolate 3D Printing: Precision Decor for Modern Confectionery
A touch-screen chocolate 3D printer enables precise, repeatable edible designs—from monograms and logos to intricate toppers and molded accents—without the hand-squeezing variability of traditional piping. With a guided interface and controlled deposition, you can move from “one perfect piece” to a consistent set for plated desserts, gift boxes, or event service. This guide breaks down what the machine is built to do, how to prepare chocolate for consistent prints, and how to fit it into a professional or enthusiast confectionery workflow.
What a touch-screen chocolate 3D printer does (and what it doesn’t)
A chocolate 3D printer creates layered, three-dimensional shapes by depositing chocolate along programmed paths. Instead of relying on freehand pressure and speed, the printer regulates extrusion to build height, edges, and patterns that can be difficult to pipe consistently.
- Creates layered 3D chocolate shapes by depositing chocolate in controlled paths.
- Uses a touch interface to simplify setup, job selection, and basic print adjustments.
- Best for decorations, toppers, small sculptures, and branded elements; not intended to replace full-scale tempering/molding lines.
- Results depend heavily on chocolate viscosity, temperature stability, and correct preparation.
Think of it as a “decor and personalization station” rather than an all-in-one chocolate production line. For many kitchens, its value shows up when detail, repetition, and branding matter more than maximum volume.
Where it fits: bakery, chocolatier, catering, and culinary classroom uses
Touch-screen control makes it easier to train staff and standardize output, which is why these printers often shine in teams that rotate tasks or work across multiple events.
- Boutique chocolatiers: rapid prototyping of seasonal designs and small-batch personalization.
- Pastry/bakery teams: consistent cake toppers, plated-dessert garnishes, and chocolate filigree elements.
- Event catering: on-demand names, dates, and themed motifs for weddings and corporate events.
- Culinary education and R&D kitchens: teaching digital-to-edible workflows and controlled deposition techniques.
Key capabilities to look for in the touch-screen workflow
When evaluating a touch-screen chocolate 3D printer, the screen itself is only part of the story. The best workflow is the one that keeps chocolate in its workable window and helps operators repeat results under service pressure.
- Interface clarity: intuitive menus for temperature, extrusion, and print start/stop reduces training time.
- Temperature control: stable heating helps keep chocolate within a workable viscosity window during printing.
- Repeatability: consistent layer deposition matters more than speed for clean edges and tall prints.
- Job handling: ability to run the same design repeatedly for production (sets for dessert service or gift boxes).
- Food-contact practicality: smooth, cleanable surfaces and accessible components support hygienic routines.
Quick product snapshot
If you’re planning to add a dedicated printing station, confirm the unit’s footprint, power needs, and your post-print handling steps (setting, storage, packaging). A stable surface, controlled room temperature, and organized tools can make the difference between “it works sometimes” and “it works every shift.”
| Item | Details |
|---|---|
| Product | Touch Screen Chocolate 3D Printer for Creative Confectionery |
| Price | 7378.49 USD |
| Availability | In stock |
| Best for | Personalized toppers, branded pieces, intricate chocolate decorations |
| Store page | https://hovira.com/touch-screen-chocolate-3d-printer-for-creative-confectionery/ |
Preparing chocolate for reliable prints
Chocolate printing is less forgiving than piping because the machine will repeat exactly what your material allows. The goal is stable flow through the print path, clean starts/stops, and layers that hold their shape while setting.
- Choose the right chocolate type: couverture often flows better than chocolate with low cocoa butter content.
- Manage viscosity: overly thick chocolate can cause skipping, rough surfaces, or under-extrusion; overly thin chocolate can slump and blur details.
- Tempering considerations: tempering improves snap and shine; some printed applications prioritize shape retention over gloss, depending on your cooling setup.
- Environmental control: drafts, hot lights, or a warm kitchen can soften layers mid-print and deform fine features.
- Batch consistency: use the same brand/recipe for repeat orders to avoid re-tuning settings every run.
Design-to-print workflow: from idea to edible piece
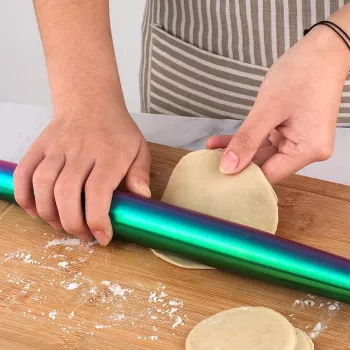
When pairing printed pieces with other components, consistency matters. For example, if you’re building a plated dessert with a printed plaque plus a crisp base, the Stainless Steel Non-Stick Rolling Pin Set for Baking & Kitchen Use helps create uniform panels or cookie layers that visually match the printer’s precision.
Cleaning, sanitation, and day-to-day maintenance
For broader guidance on safe handling and hygienic routines, refer to the U.S. Food & Drug Administration (FDA) — Food Safety for Consumers and the Codex Alimentarius — General Principles of Food Hygiene.
Common print issues and practical fixes
Slumping or loss of detail
Gaps or under-extrusion
Stringing and messiness
Warping or cracking
Tools and accessories that complement printed confections
- Finishing and shaping: Stainless Steel Non-Stick Rolling Pin Set for Baking & Kitchen Use for consistent bases, panels, or dough components that pair with printed chocolate.
- Serving and plating: Beautiful Stainless Steel Shell Spoon – Elegant Kitchen Ladle Set for clean, intentional presentation when a printed element is used as a plated garnish.
- Storage: Elegant Cork Stopper Glass Storage Jar – Transparent Food & Tea Container to help protect inclusions, toppings, or small finished pieces from humidity and kitchen odors.
With the right station setup and repeatable chocolate prep, the Touch Screen Chocolate 3D Printer for Creative Confectionery can shift intricate decor work from “artisan bottleneck” to a dependable, on-demand step in service.
FAQ
What happened at the end of the chocolate touch?
At the end of the children’s novel, the protagonist learns a lesson about his choices and the consequences of wanting too much. He’s ultimately able to resolve the problem and changes his behavior going forward.
What grade level is the chocolate touch for?
It’s commonly recommended for upper elementary readers, often around grades 3–6 (roughly ages 8–12), depending on reading level and classroom goals.


Leave a comment